Showing posts with label wargames. Show all posts

Friday, June 2, 2017

French Foreign Legion - Légion Étrangère - WWII

I know it has been a long while since my last post so I'll try to get back up to speed now that we are entering the summer months and I should have a bit more hobby time. I planned for 2017 to be spent mostly working on World War Two miniatures. Northwest Europe mid-late war to be exact. I have had some deviation to other periods to break it up a bit but I have remained somewhat focused on my project. I didn't really plan on doing anything desert related but I was trolling the web looking for reference photos on painting some StuG III's and came upon some desert photos. Well a couple of clicks later I saw a post about the French Foreign Legion's 13th Demi-Brigade defense of Bir Hakeim. One thing led to another and soon I found myself trying to find metal miniatures in 20mm. Just for a small side project I told myself. Besides, who doesn't love the mystery and intrigue of the legion?
Now how to establish a harem in the Laundry Room Barracks and slip this lass past General ze Wife.
There are some nice offerings in 28mm but if you are interested in 20mm (1/72) figs like I am,  you will really need to do some digging or plan on doing plastic conversions of your own. I found a guy in France who does conversions/sculpting for this period and he casts his miniatures in small batches. I quickly purchased the three sets of miniatures he had on hand totaling about 61 figures including command, mortar teams, artillery teams, MG teams and fighting men. Most of the poses are unique with little repetition so you get a wide variety of useful figures.
Yes I know they didn't all fight in their Kepi Blanc but hey, it's the legion and they look cool.

The more I dug into and researched the 13e DBLE I realized I would be expanding this project from painting a few squads to creating the full brigade (well, a representation of it anyway). I am now on the lookout for figures to use for French colonial forces at the time including some pretty cool units that I will get to in future posts.
Defense of Bir Hakeim 26 May-11 June, 1942

13
e Demi-Brigade de Légion Étrangère

The brigade was created in 1940, and with the Senegalese Tirailleur Regiment of Tchad became one of the two regiments which rallied as a constituted unit of the Free French Forces. The 13e DBLE would be part of most major campaigns the armed forces of France during WWII.
The legion's defense of Bir Hakeim along with the 1st Free French Brigade against the DAK and Italians had lengthened the Axis supply route around the south end of the Gazala line while causing them losses. It also gave the British time to recover in the wake of their defeat at the Cauldron and regroup and set up a defense for the First battle of El Alamein. 
Bir Hakeim, Libya
Their are some fun story lines that could be used as wargame scenarios or objectives like French General Marie-Pierre Koenig's affair with English nurse and ambulance driver Susan Travers, the only women to formally be enrolled in the Legion Etrangere. She was an Adjudant-chef which is similar to the rank of lieutenant. Perhaps  a victory condition or points is to capture her (sorry, just thinking out loud).
So after searching and finding my first figures, doing some research on the unit, finding some reference photos for painting/modeling I have completed about thirty of my guys thus far. Not huge progress, but steady progress as I continue my year of World War Two. I have also bought and painted a fort I can use for them to defend as well. It is Italeri's African House. A great model although a tad pricey but I think it was worth it. I will get some use out of it for my moderns as well I think and perhaps 19th Century Legionnaires on their quest to colonize north Africa. Did I just say that? Slap me. I really don't need another period. Arghhh, to late. I already ordered some figures. Oh, well...more to come on this.


So here are some photos of what I have completed so far. If you have any questions please feel free to ask. I'm not expert in WWII or specifically the desert campaigns but I've done a bunch of research to date and can hopefully steer you in the right direction for information. Thanks for checking this post out.
Italeri 6139-African House. Aprox $50 US.

A few of the 20mm Guilhem Dalou figures for scale using the Italeri building model.


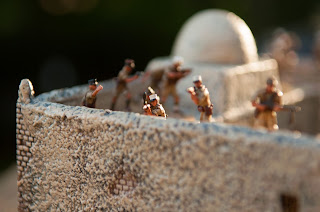
Not a fighting set-up, just wanted to show how many figures the fort could hold. This is about 30 figs on the walkway. The roof also is removable to allow figures to shoot out the windows and there is a nice courtyard where more figures, vehicles, etc. could be. My guess is you could get about 100 figures total inside the fort if you wanted to.


Saturday, August 20, 2016

Rescue in Al-Qunytirah AAR

After spending the better part of four evenings trying to get in my last game (being a dad tends to cut into long stretches of my time), I didn't want to leave an event unresolved. Besides, General ze Wife and the youngest Teenage Spy were still enjoying the final days of their retreat with the Queen Mother. If I could get a new board set up and get a quick game in I would still have time to tidy up the fort, clean the mess hall and check on the laundry detail before I needed to pick the General and her trusty associate up at the airbase. In the last game, a Crew from the BBC had been captured by an insurgent militia (see previous post). During a major firefight in the game prior to the UN petrol storage base at Al-Qunytirah being overrun, four BBC journalists were taken hostage. I couldn't just pack up the troops without continuing this story line so...

An informant provided intel that the crew were being held at a compound in the lush agricultural area several miles from the city where the battle had taken place. A team of U.S. Special Forces was assembled to rescue the TV crew composed of a British reporter, a Welsh producer, an American sound man and an Australian cameraman. Although the crew was working for a British TV network, the Americans were chosen for the mission due to their proximity to the location. Rumor has it British SAS were preoccupied watching a cricket match and eating crumpets and tea. Sources have been unable to confirm this though. It could actually be because I don’t have any British Special Forces miniatures. Either way, a hostage rescue mission was underway.

Rules: Danger Close    Scale: 20mm | 1/72

MISSION AND OBJECTIVES:

The two Special Forces fire teams would be four members strong. A Lieutenant attached to fire team 2 would be leading the raid. Each team was made up of a team leader, SAW gunner, rifleman and a Grenadier.
The U.S. Special Forces Fire Teams. Mostly Mars 72003 Modern US Soldiers.
The two teams would use the cover of darkness to arrive on the outskirts of the compound at dawn. They had been dropped several km away and made their way to the southwest corner of a small village. Two buildings were inside the compound but the informant did not know which one held the hostages. Intel determined an enemy force of about 15-20 fighters were in the village and the compound. The team would need to rescue the hostages and make their way north to a rendezvous point for air extraction.   
Recon photo of compound looking west.

Recon photo of compound looking south.

Recon photo of compound looking southeast.

U.S. Special Forces arrive at the village just before dawn.
The rescue team prepares to enter the village from the southwest. Here they will split up into two fire teams. Fire Team 1 will go northeast from this point. Fire Team 2 team will head north past the market (corner seen) and then move east toward the compound through the fields.

The Lieutenant gives some final instructions before the teams break apart.

Fire Team 1 moves out slowly. 


Shortly after moving into the village Team 1 is spotted by one of two insurgents in a ruined building. He fires into the first light of the morning slightly injuring a member of the team.

The two insurgents in the building didn't know what hit them after firing that shot. Probably best to let operators just walk on by. It was lights out for those guys.
Fire Team 2 makes their way through a field and keep moving toward their objective. You can see Team 1 behind them tending to the light wound.

Team 2 is forced to split up after hitting a Random Event marker. Not a big deal as they just needed to check on some movement on the left flank. Just a stray dog.

Moving slower than normal due to the injury, Team 1 finds themselves in a tight spot. The brief firefight with the insurgents in the building has attracted the attention of three insurgents who were walking down the dirt road toward the compound (activated by hot spot). Two of the insurgents are able to spot the team making their way up a knoll to their right. They fire and miss. Fortunately the SAW does not and one insurgent is soon on his way to meet Allah.  

Hearing the commotion, the insurgents in the compound scramble to take a defensive position. Three members of Team 2 are heading to breach the compound wall on the southeast corner near a small garden area. The other two members of the team will enter from the southwest corner. 

An insurgent on the rooftop spots the team moving through the field. He takes a shot and causes another light wound to the team. The insurgents who were moving up the road on Team 1's left flank are able to kill two of the team members in the chaos of the fight. Team 1 is taking fire from the left and from the their front. The two team members alive are both wounded and work as quickly as they can to move their fallen comrades and themselves to the cover of some thick brush. The insurgents don't spot them and run toward the compound.
Slow and steady.

Insurgents ready for a fight within the compound.


The compound is breached by members of Team 2.

Crawling up behind an insurgent a team member silently sends him to martyrdom.

Three members of Team 2 reach the first building of the compound and throw in a concussion grenade.

The SAW gunner let's loose on insurgents on the rooftop of the next building.

The rooftop threat is subdued.


After an intense firefight inside the compound, the Special Forces operators are able to free the hostages and regroup with their injured and dead on the dirt track in front of the compound. Shortly after regrouping a team member triggers a mine. Three soldiers and the producer are hit. The blast kills the Lieutenant. 


Sgt. Nelson takes control of the team and keeps their moral intact enough to keep them moving to the extraction point. 

The team encounters resistance from three insurgents who appear on the dirt track north of the compound and about 1km from the extraction point. The team opens fire on them and the SAW gunner hits his mark quickly eliminating the threat. 


The team has accomplished their mission, rescued the hostages, and no man was left behind.


Victory to the Americans for completing their objective of freeing the hostages and getting off the north side of the board.